relier-web
Web visualization of sensor data from relier acquisition system
This project is maintained by Ricardosgeral
relier-web
Live streaming of test sensor data from relier acquisition system
This repository contains the code, files and all the instructions to deploy a web app that allows live monitoring of the
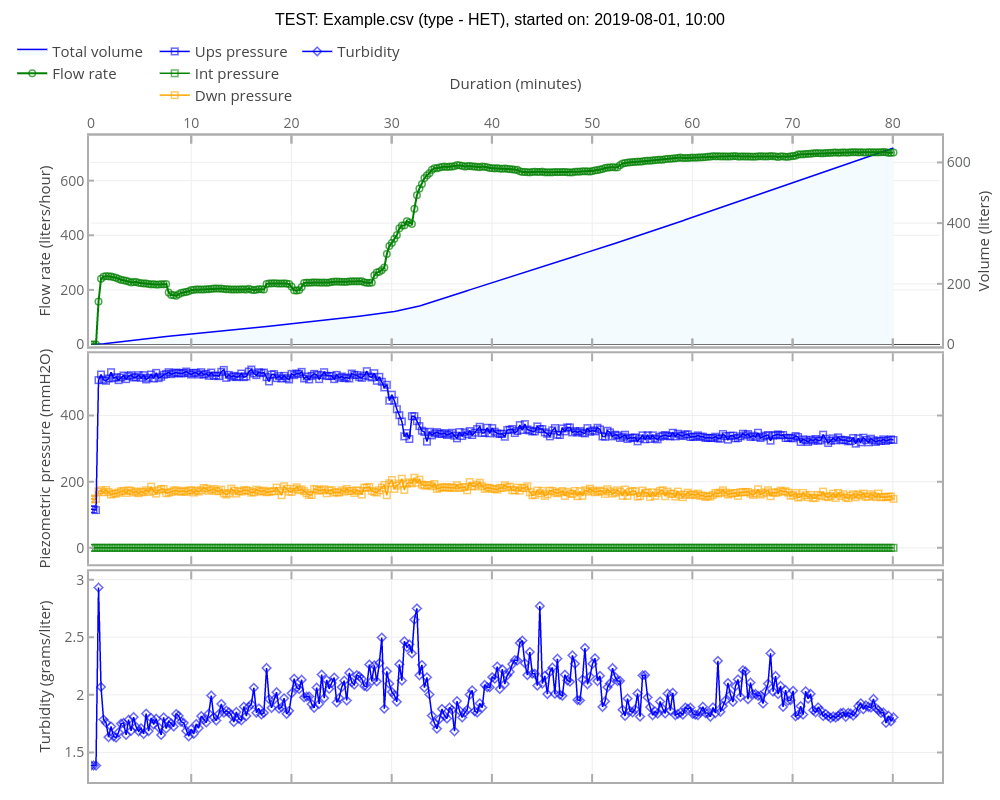
the sensors data acquired with relier acquisition system. The app should have the following layout after deploy to
***https://
App main features:
Programming code : Python 3.6
Web interface    : Interactive Python Dashboards with Plotly and Dash libraries
Web app cloud    : Heroku (the app is deployed as a Docker container)
Database for i/o : PostgreSQL is used as an Heroku addon, to store inputs and outputs of tests
HOW TO DEPLOY the python app to the web
First of all, you will need to create an account on Heroku. Its free, and no credit card is required. It allows up to 5 simultaneous connections and a database with up to 10000 rows. NOTE: The instructions below were tested in a laptop running with Ubuntu 18.04.
1- Install Heroku Cli
$ sudo snap install heroku --classic
2 - Install Docker (CE - Community Edition)
The app uses Pandas and Numpy (Python libraries that use ‘obscure’ C dependencies), so it needs to be deployed as a Docker container. For more info look here and here. To install Docker CE execute the following commands sequentially:
$ sudo apt-get update

$ sudo apt-get install \
  apt-transport-https \
  ca-certificates \
  curl \
  software-properties-common

$ sudo curl -fsSL https://download.docker.com/linux/ubuntu/gpg | sudo apt-key add -

$ sudo add-apt-repository "deb [arch=amd64] https://download.docker.com/linux/ubuntu bionic stable"

$ sudo apt update

$ apt-cache policy docker-ce

$ sudo apt install docker-ce

$ sudo systemctl status docker        # this command allow checking if docker is running
3 - Create the app in Heroku (alternatively you can do this in Heroku web site)
$ sudo heroku login                                  # log in Heroku (email and password are asked)
$ sudo heroku create <APP_NAME>                      # This creates the app (choose your <APP_NAME>)
4- Create a PostgreSQL database on that Heroku app (alternatively you can use the Heroku web site)
$ sudo heroku addons:create heroku-postgresql:hobby-dev --app <APP_NAME> # this creates a free PostgreSQL database for the app
5 - Send a docker container (with the code that is in this GitHub repository) to the Heroku server
$ sudo heroku login                                   # login in Heroku (email + password required)
$ sudo heroku container:login                         # login in Heroku container (interaction with Docker)
$ sudo rm -R relier-web                               # Delete folder (ignore if folder does not exists)
$ sudo git clone https://github.com/Ricardosgeral/relier-web  # This clones the repository in github with all code required
$ cd relier-web                                       # go to the directory just created
$ sudo heroku container:push web --app <APP_NAME>     # create a Docker image and push it to Heroku (can take several minutes)
$ sudo heroku container:release web --app <APP_NAME>  # release the app in the web (know the site should be running)
NOTES: the ‘push web’ command (second last) will pick the Dockerfile, which, in turn, builds the Docker containers on top of heroku/miniconda:3 Docker image. It will also grab and install the python libraries listed in requirements.txt, install pandas and numpy in miniconda framework, and configure the Web Server Gateway Interface(WSGI) using gunicorn python web server.
After ‘release’ of the containers the app should be running in ***https://
When a laboratory test is being carried out, results are shown in ‘live streaming’. Webpage is updated every 3 seconds (this can be changed in app.py). If a test is not being performed, the site will show the last test carried out.
Attention: PostgreSQL database is cleared each time a new test is started. Note that test results are stored in CSV format (either in the SD card or USB drive). For more information.
Inspection of PostgreSQL database values using DataClips in Heroku
Open your web browser and log in at https://heroku.com Access https://dataclips.heroku.com In the top-right corner push the button “Create DataClip”
 - give a name to the dataclip (example: Outputs)
 - choose the database created previously
 - write in the textbox:
    SELECT * FROM testdata ORDER BY id
 - Push the button "Create DataClip"
This will allow you to inspect the test results values. You can create another DataClip for the test Inputs, putting in the text box:
SELECT * FROM testinputs
Debug eventual errors of app after deploy
$ sudo heroku logs --app <APP_NAME> -t
    ctr+z to leave